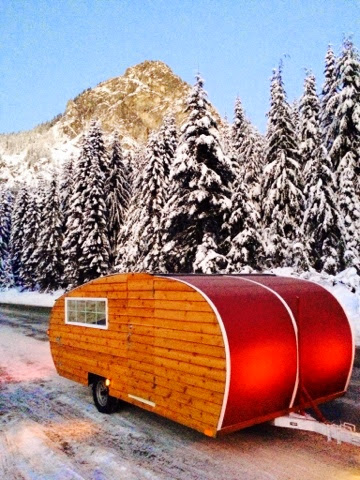
Cascade Mountains, WA

Cascade Mountains, WA
New Year's in Washington's Cascade Mountains

Friday, November 20, 2015

Featured at Build Small Live Large Summit

The city of Portland recently hosted a summit of regional thought leaders, architects, designers and home owners involved with small footprint housing, Homesharing and rentals via Airbnb and VRBO, Accessory Dwelling Units (ADUs) and the Tiny House Movement. 


Homegrown Trailers and the Green Trailer Project were featured and we received hundreds of inquiries on sales and rentals. This official pushed us over the tipping point and we are putting plans in place to launch a Crowdfunded rental and sales campaign in January, more to come soon!


Read more on our partner website - 
http://commonagenda.net/services/build-small-live-large-summit/

Wednesday, March 25, 2015

Office with a View


While an office with a view comes with a hefty premium in Seattle these days, I have found some great spots to setup shop at local parks and along strips of waterfront parking where I am not robbing others of two parking spaces or paying an hourly rate. As a consultant with a home office, I often find that I will have hours of downtime between meetings. This typically results in trying to find a quiet corner in a coffee shop and buying enough snacks and drinks to not feel like I am loitering all afternoon.

Today was one such day and while the weather called for a 90% chance of rain, I decided to turn my 6 hours of downtime today into a productive day and adventure to Seattle's Magnuson Park. Plus, I avoided putting an extra 30 miles on my vehicle and saved at least an hour of commute time by not heading back to my office in between meetings. Productive, lower carbon, happy camper kind of a day!


Sunday, March 22, 2015

What Makes This Project "Green"?

With Earth Day just a month away, and the International Living Future Institute's 2015 "unConference"  (where I happen to be presenting) just a week away, it seems prudent to talk about what really makes this project green.

Green has become synonymous with marketing and I am definitely a pawn in that game. While I
am comfortable admitting that, my fear is that people will think that the use of the term was just that...a marketing concept. Quite the contrary, and I am going to spend the next 5 weeks, right through Earth Month, sharing the thinking behind this project with the hopes of inspiring and motivating all of you to consider some new or enhanced lifestyle choices...because in the end how green we are really comes down to the choices we make in life.

The ultimate goal of this project is to provide my family and friends with a higher quality of life while producing the smallest environmental impact possible (vs. the status quo) and doing this in an economically feasible way for a family of four on a relatively tight budget. As a professional who makes a living as a self proclaimed Sustainability Coach in one of the greener cities in the country, Seattle, I claim to know a thing or two about what makes something truly sustainable. I am also an avid "polar fleecer" who has survived some crazy adventures in wild places and more recently weathered the great recession by innovating personally and professionally and came back stronger and more prepared for the future, so I also claim to know a thing or two about resilience. 

While I gained tons of motivation for this project from the Tiny House and Teardrop Trailer movement, it was truly the inspiration of the  International Living Future Institute (ILFI) and the Bullitt Foundation project to design and build the greenest office building in the world based on the Living Building Challenge (LBC) standards. The Bullitt Center is not only uber green, but incorporates cutting edge technology, has bountiful natural light (even in grey Seattle) and is a gorgeous piece of architecture. To frame my thinking on the Green Trailer Project, I am going to walk you through my thinking in the context of the LBC Petals - Place, Water, Energy, Health & Happiness, Materials, Equity, Beauty and I hope you will join me by sharing and tagging me on facebook, twitter (@CoreyWeathers) or Pinterest or just leave a comment with your thoughts in return!


Monday, March 9, 2015

Spring Arrived Early in the NW!

Wow! 68 degrees and sunny the first week in March? That was the reality this weekend and we just had to get out of town for the weekend!


I put the girls to work early Saturday morning packing their bags and decking out the trailer with its new address to share our story with all of the admirers we see along the way. Shoot me a comment if you saw us on the road this weekend heading from Redmond to Vantage, WA!


The road in is a bit rocky so we took it slow and our little cabin on wheels hung on just fine, we actually faired much better than the Prius who tried to camp nearby!


We settled into a sweet and cozy campsite near the Feathers climbing area  around lots of other climbers who made good company and stopped by frequently to admire our home away from home.


Two of our best friends joined us for the weekend, one is a green building guru and we came up with a new idea for the solar system. Rather than mount the panels on hinges on the roof, we are going to build a stand that attaches to an upright on the trailer frame and pivots to track the sun. As you can see above I positioned one of the panels at an angle to track the sun and we were able to improve the efficiency of the panels by 30-50%...I was even pulling about 80 (out of 200 potential watts) at 9:00 in the morning after the sun first came over the ridge.

Best part of the weekend was sharing all of our comforts with friends. More than once our friends remarked how amazing it was to have a kitchen, sink, toilet, power and a warm place for breakfast early on a frost covered morning in the desert! 


Monday, February 16, 2015

Mobile Office for the Day

Some people dread going to the office, I cherish the opportunity! Since the girls are out of school and so is Heidi as a teacher, I needed a place to work away from the house for the day. Considering the weather was cold yet beautiful, it was a perfect opportunity to deploy the newly attached solar panels and work remotely for the day.


I packed up my Google Chrome laptop with LTE service and headed to King County's Marymoor Park (http://www.king county.gov/recreation/parks/inventory/marymoor.aspx) and for the $1.00 parking fee I had the best net zero energy office with a window, two actually, for the price!

Thursday, January 1, 2015

Adventure #6 - Snowy Snoqualmie Pass

After making some winter upgrades it was time for an adventure in the snow. While I would have loved an overnight, Heidi and the girls were a bit leary of how comfortable the trailer would be in below freezing temperatures.


I turned on an electric heater inside while still in the garage before departing to warm the core of the trailer, and after 90 minutes of driving in below freezing temperatures, the trailer was still quite warm inside when we arrived! Walls are made if 1/2" beveled cedar siding, tyvek house wrap, 1 1/2" EPS foam core insulation, then either 1/4" or 1/4" interior ply glued and stabled to the 2x2 and 2x3 frame.


After we deployed the pop-top to make dinner in the indoor kitchen, we did lose some of the heat as instill need to install a neoprene sleeve around the opening on the rear hatch, this will be the next step before we venture out on an overnight. I also need to install a carbon monoxide sensor for the propane stove and possibly consider a small propane heater as the electric heater I have tends to trip the alarm on the inverter when it starts up, but that is a topic for another post. I also am considering an induction cooktop so that we can be truly "net zero" on energy use and also create a healthier indoor environment by not burning propane indoors. This would require a larger battery, inverter, and additional solar panels.


After dinner and a very cold beer we got to take in an extraordinary moonrise and sunset, then headed home as the temps dropped back into the teens, brrrr.
Overall, I was quite happy with the winter performance of the insulation and very pleased with how easy the trailer was to pull in the snow. The VW Tiguan did amazing, didn't slide or lose traction at any point, even on then icy inclines. Can't wait to head back to the snow!


Thursday, December 18, 2014

Finalizing the Interior


While the exterior look has been an incredibly important part of the project, getting the interior space right has been a bit of an obsession. From finding a bed that would fit inside and be long enough for my 6'1" frame to sleep in comfortably, to the right combination of lighting to fill the trailer with sufficient light without requiring excessive solar panels and batteries, the details have been exciting to work on, especially with the goal of making the interior both aesthetically appealing and functional. 
Queen bed converted to dining area, composting toilet, entrance.

Initially, I had planned to have the bunk beds fold down from the wall, but after realizing I could make the trailer 6" wider (7'4" vs. 6'10"), the bunk beds could be permanently in place and still provide sufficient room in the kitchen. While the bunks are just over 6' long, they have hosted adults once so far who seemed to have sufficient space. The kitchen still has a few quirks to work out, but is a dream to cook in while camping...I have always been accused of being a gourmet on the road and the kitchen was really designed to fit me and my cooking style, there is plenty of counter space, a sink, powerful gas cook top, and almost everything one could possible want for the ultimate "glamping" experience!
Kitchen with refrigerator, foot pump sink,
two burner cook top
Twin bunk beds

Sunday, October 26, 2014

Adventure #5 - Vantage Rock Climbing

October in the Pacific Northwest is always a bit of a wild card in terms of weather. I always tell people who are new to the area that you are bound to have fairly decent weather until Halloween when things take a dramatic turn towards winter. With the prospect of one last fall weekend for an outdoor adventure we packed up and headed to "Vantage" or the Frenchman Coulee climbing area just east of the Columbia River off I-90.

Vantage is one of my all time favorite places to visit in the spring and fall as it only gets a few inches if rain each year and can be a pretty sure bet for decent weather when Seattle is pouring buckets or socked in with fog. Both happened to be the case along with 40-60 mph winds in the forecast. 

Vantage also happens to be one of the places that inspired the green camping trailer. Kayden, my oldest daughter, and I came out here two falls ago with a group of friends and while she enjoyed roughing it with her dad at five years old, she absolutely refused to poop in a hole or use the un maintained honey buckets. Three times that weekend we drove 6 miles to the General Store in George for her to use the restroom...I was bound and determined to find a better camping solution after that weekend.

Since Vantage is literally in the middle of the desert and far from any established infrastructure, it is the most rustic of rustic camping experiences. No power, no running water, no protection from the elements, and until recently only a seasonal honey bucket. In Februrary of 2014 a group of passionate climbers were able to petition for and raise the funds to install a sanctioned toilet! (http://www.washingtonclimbers.org/Current/VantagePot.htm) Regardless, it is still very rustic and challenges the family camping experience...a perfect test to see if my creation was up to the task.

We arrived in the afternoon to sunny skies and the threat of rain on the horizon. I quickly deployed the pop top, setup the REI alcove that I picked up at the REI garage sale last weekend for $40 and waited out an hour of rain, that also brought a spectacular full rainbow!


It wasn't long before we had a number of visitors, especially with everyone returning to camp from climbing once the rain set in. Blue and his two boys were the first to come say hello. They were sporting a recently modified diesel Sprinter with full kitchen, custom bench seat that converts to a King size bed, and 300 watts of solar for the full off grid adventure rig. Van came by who happens to have a converted van (Ford E-350) that he is currently tricking out for climbing and maybe a trip to Tierra del Fuego with his journalist girlfriend when she gets back from Korea. And Paul brought his whole entourage by for a look. He is considering building a tiny house on wheels and was thrilled to hear my story and see what I had accomplished without formal carpentry training...he is in the same boat and hopefully my story inspires him to take the next step!

We finally got in a few climbs Sunday after an incredibly windy night, at least 30-40 mph sustained winds for a few hours, and they skies cleared so incomes deploy one of the solar panels to add a bit of juice back to the battery.

The girls lasted for a few hours of climbing until the wind and clouds returned and we retreated to our cozy base camp for grilled cheese and a few games of go fish.

Friday, August 29, 2014

Adventure #4 - Lake Easton State Park, WA

Shooting for something fairly close to home with spots available on Labor Day weekend, we headed out to Lake Easton State Park just east of Snoqualmie Pass on I-90. While their is no big lure to stay at the state park, it is quite a nice setting and an easy 90 minute drive from Seattle. Plus, there is a sandy beach and play structure for the kids!

This was the first adventure where we have literally left as soon as I got home from work. While I did quite a bit of prep work the night before, most of the "packing" happened in about 45 minutes and of course a few essentials were left behind...tooth paste, my pillow, and the girls were very disappointed to have no maple syrup for breakfast.

Since this was Labor Day weekend, camping space were limited, but we arrived Thursday and were able to claim a first come first serve site. It was fun on Friday to watch all of the people arrive, and the streamed in pretty steadily starting about 2:00. The interesting part about camping on a long holiday weekend is that you get lots of people who don't often camp and I found that considering how many people were camping, I didn't get an overwhelming number of visitors. My favorite were a couple from Utah with their 3 year-old and another on the way. They had built a custom camping trailer modeled after a European gypsy wagon, and while small for a family, they had been on the road for about a month! They were a bit jealous of my sink and I was jealous of their pot belly stove...more inspiration to consider!


We did get to try out a few new conveniences, including a redesign to the sinks water holding tank. 

The design is quite simple and includes a 5 gallon bucket with an outlet at the bottom and a foot pump attached to the top for pressurizing during use. 5 or 6 pumps provides enough pressure for about a minute of washing and with a faucet aerator installed, we use less than .5 gallons per minute (gpm). 


I also finished wiring the 120 volt outlets, installed a new 35 amp hour battery and an 800 watt inverter. Combined these two additions will allow us to run lighting and charge phones/iPads for at least two days, in theory, and I am hopeful that we will have enough power to get through two nights. I played with charging the battery via solar panel this week, but either have a faulty charge controller or a bad connection as the charge controller would not register an amperage reading from the solar panel. Eventually I will upgrade to a 140 amp hour battery once we decide to install a refrigerator, but for now the 35 amp hour battery should meet our needs.

The best part about the new power supply and outlets is the ability to stay up and read after the girls go to sleep. Contrary to what my wife would say, I really do enjoy reading, just don't often find the time. I found LED lights at IKEA with a USB port and used our old iPhone charging bases. They only use 1 watt of power, but provide ample light that can be focused just on the book.

Cheers!


Sunday, August 24, 2014

Adventure #3 - Gorge Amphitheater


Epic weekend with good friends watching one of our all time favorite performers, Jack Johnson, and had a surprise performance from Eddie Vedder, one of our other favorites...the night could have been one of my top 10 experiences ever! It was surreal!!!

The camping trailer was a magnet as soon as we pulled into the Gorge camping area, our friends following us said that people just stopped and stated as we drove by. We had a pretty steady flow of admirers throughout the afternoon  interested in how the concept came about, how long it took to build, and the process I went through. We even had one woman stop by to say "you have built my dream!"...so much fun to get these kinds if comments!


I brought along one of the soon-to-be installed solar panels and unfortunately had a wiring issue that I need to resolve, but hooking it up was quick and will allow us to be out for days in a generally sunny environment. Eventually I will be adding a wind turbine for days when the sun doesn't shine.

Kitchen coming together

In preparation for a trip to the Gorge Amphitheater to see Jack Johnson (with a surprise guest appearance from Eddie Vedder!) I spent some time getting the kitchen fully functional, including the sink powered by a foot pump.
This included finding a great set of bathroom vanity cabinets at Second Use in Seattle. I had to trim a few inches off the bottom, but they are an amazing compliment to the kitchen space and provide some much needed storage for pots, pans, snacks, dry goods, and games for the girls.

Monday, August 18, 2014

Flooring Complete!

Choosing flooring proved to be a much more challenging decision making process than anticipated. 

Lightweight quickly eliminated most options, including bamboo and most cork which topped the list.

Flexible in order to move with the trailer eliminated most of the rest.

It came down to self adhering cork, which unfortunately didn't seem like it would hold up to wet feet or bikes and the abuse of dragging coolers and gear in and out, so scratched that from the list.

Vinyl was easy to scratch due to the PVC and VOCs that would off-gas and create an unhealthy indoor environment.

In the end, while it didn't even make my initial list, laminate won. It is fairly lightweight, very durable, flexible and affordable. While not the greenest of materials, most manufactures now have a "green" line that offers low VOC embedded adhesives and comprehensive production recycling standards. I also decided to nail rather than glue the laminate, and because if the small space (about 60 square feet) I was able to use laminate with interlocking  panels and nail around the edges that will eventually be covered by moulding.


Sunday, August 10, 2014

Adventure #2 - Ocean City, WA


Nearly a year ago I conceptualized the idea of a family camping trailer that could take us anywhere we wanted to go in style and with minimal impact on the environment. While some may not agree that driving on a beach fits the bill for "minimal impact", it has been a romantic idea that this weekend materialized. Since the trailer has only been functional enough to tow since Memorial Day weekend, booking a camping site at a popular state park has been pretty much out of the question.

I had been watching https://washington.goingtocamp.com regularly to see if anything popped up via a cancellation, and on Friday morning a prime site at Ocean City State Park opened and I booked it immediately. We hitched up Saturday morning and took our time after leaving I-5 at Olympia winding through back roads and stopping to take in the sites. 

We realized after stopping for groceries in Aberdeen that Kayden forgot a swimsuit, a must for this little open water aficionado! Walmart was next to the grocery store, so I pulled around and parked in the loading zone while Heidi and the girls all went inside to find a swimsuit. It didn't take more than 10 minutes, but in that time I had a steady stream of admirers stop by to take a look, ask questions, offer a compliment or want to take a peak inside. It was if I had just towed the circus into town for its annual visit, just amazing!


We finally ended up at the state park in space 153, with lots of space, some share, full utilities and just a few hundred feet from the beach trail. I was on cloud 9!

The state park and beach are buffered by a beautiful series of wetlands and sand dunes, and about a 4 or 5 minute walk gets you onto the beach that stretches for miles in each direction. Driving is allowed on this section of the beach, which at first seems completely disrespectful, but drivers are quite courteous and there is plenty of room for vehicles and people, along with herds of horses and riders, scooters and kites!


We opted to spend our Sunday afternoon on the beach and decided we would try out driving...it turned out to not only be easy, but a great way to spend the day and how nice to have a kitchen and solar shower at our immediate disposal!


Saturday, July 26, 2014

Rear Window in the Pop-top

The finished product with trim in place ready for summer.
Stapling the screen in place.

The rear "window" was designed to serve a number of critical needs for the trailer.

1. Bring in much needed natural light to prevent the need to use indoor lighting during the day, complementing the available light from the two windows.

2. Provide ventilation for hot days and cooking.

3. Allow for the outdoor camping feel with all the amenities of an indoor space, and keeping the trailer effectively free of bugs...a solution is needed for the door though as it is tough with 2 kids to keep it closed when camping!

4. Finally, offer structural support for the pop-top when deployed.

When the pop-top was first designed (below) it was intended to pop-up completely with four sides and no hinges. It would slide on industrial drawer slides and have 4 adjustable gas struts to lift. With this in mind, I designed the back "pocket" where the rear wall/window would tuck inside to be just big enough for the width of a window to move up and down.

Original pop-top design.


After a necessary redesign to the pop-top, due to complications lifting a heavy wood structure with minimal margin of error for flex, I transitioned to a version that attached at the fore end of the trailer via three industrial door hinges and only requires two gas struts near the aft end of the trailer. These struts are also a standard 125 pound version and cost about $40 each versus the adjustable version I had previously spec'd that would have cost at least $150 each and needed to be shipped from Europe...I could not find any produced or sold in the US.

Close up of the hinged rear window.
After the transition to the new design, the back wall came in and out of the "pocket" at an angle and no longer would allow a window to fit. Because of this, the rear window now has hinges and moves fore and aft as needed to lift and lower. In the future, I will be building a removable and insulated panel with a sliding window for the rainy and cold months of the year. For summer time, the large screened in window is quite nice! I am also conceptualizing a cover for the back that will button in place using sunbrella fabric, the same time used on exterior boat covers. This will act as a rain fly in wet weather, an insulated barrier during shoulder season adventures, and extra insulation when the removable and insulated panel is installed for winter camping. It will be a bit of work to make the seasonal transition, but allows us to have the best of all seasons.


Sunday, June 15, 2014

Adventure #1 - South Whidbey Island State Park, WA


The maiden voyage for Father's Day!


Waiting for the ferry to Whidbey Island in Mukilteo, WA.


South Whidbey Island State Park


Daddy forgot to seal a recently nailed seam on the roof and it rained cats and dogs all night! Fixed it temporarily with duct tape.

Saturday, March 8, 2014

To Sheath or Not, That is the Question

Sheathing adds tons of strength and rigidity to a structure, but also weighs a significant amount, something I couldn't justify if I was to stay around 2000 pounds for the "dry" weight of the finished product. Being a spreadsheet guru, I built a spreadsheet that would allow me to estimate materials
My fellow green innovator, James, helping to finalize the house wrap.
and the total weight they would contribute. Also interested  more in building something that met my specific needs and not too worried about anyone else at the lumber yard thinking I am off my rocker, I took a few trips to both Dunn Lumber, our local lumber yard, and Home Depot to use our home scale and weigh myself while holding lumber. I then subtracted my body weight to get the actual weight of materials.

You would be amazed at how much 2x2's, 2x3's, 1/4" ply, and 1/2" ply vary in weight, and how much they vary compared with "standard" weights one would find online. I likely saved a few hundred pounds by hand selecting the materials I used versus ordering them in bulk. I also took the time to hand select the 2x2's and open bundles to find those that were true and not warped. 2x2's in particular can vary in weight by up to 2 or 3 pounds and many are warped and not appropriate for framing.

To gain the most rigidity possible while reducing weight and giving the interior a log cabin like feel, I opted to flip the traditional framing process on its head and use the interior walls as sheathing. The walls then came together in this order.

Interior - 1/2" or 1/4" ply walls - 2x2 or 2x3 frame - 1 1/2" EPS insulation - Tyvek - Cedar siding

Since 1/2" ply was used on the front end and the roof fully connected to the walls, everything stayed plenty rigid. Near the aft end of the trailer, and where the pop-top did not provide a connection point
between walls, I had to use metal straps (salvaged from a nearby home construction site) to provide greater rigidity.


Steaming the front rad
For the from and rear "radius" and the top, I used moisture resistant underlayment in either birch or a sustainably produced eucalyptus 1/4" inch ply on both the inside and outside. This same process was used for the roof of the pop-top and did require some steaming and then bending to get the right shape without breaking the outer ply.

Sheathing on the interior, metal strapping for strength when using 1/4" ply instead of 1/2", and the original pop-top design.